Its been a very busy week or two for me with both VIUD and non-VIUD related projects....
Aluminum Anodizing
I'm happy to say that the 150 Aluminum VIUD's are finally off to anodizing! The polishing of the bodies went well with no unforeseen issues. The preparation of the plugs took a little longer than expected. Originally I was looking into buying or making a broaching set for squaring the rounded inside corners of the plug. However, I decided to simply file the corners by grinding a small square file to be the exact width of the hole and making a simple handle to hold the file. Filing the Aluminum plugs took some time but was relatively easy and we'll see if the same holds for the Titanium plugs. I wasn't going to polish the plugs but the filing created a sharp edge which was good to get rounded with a quick buffing. Next step was cleaning everything. The buffing process caked a considerable amount of debris in all the nooks and crannies of the parts so I soaked everything for a day in Mineral Spirits and then brushed/wiped each part and left it to dry. For this production run I'm doing four basic colors for the Aluminum VIUDs:
Black (already done)
Red
Blue
Green
There are a large number of potential colors I could use but there is a large minimum charge for the anodizing so we'll start with these four colors and expand in another production run if there is demand for any more.
A Little More Impact Testing....
I did another run of impact testing with a new set of USB circuit boards and a modified epoxy filling technique to ensure everything works as expected and there are no premature failures. Fortunately, the VIUDs fared better than my new stone target which broke clean in half while testing the Titanium VIUD at speeds above 200 km/hr.
Another Broken Stone Target
Fortunately I think I'm done with impact testing for now as I don't know what I can actually use for a stone target that won't break on me...perhaps a really thick custom made concrete pad with rebar reinforcement. The Aluminum VIUD managed to survive up to impact speeds of 230 km/hr on the stone target which seems to be the typical failure point for the modified epoxy technique. The Titanium VIUD broke a new record by surviving impact speeds up to 250 km/hr on the stone target which is rather incredible when you think about it let alone experience the violent event itself.
Cap Magnets
I've always been trying to figure the best way to secure the magnets in the cap. Initially I tried superglue which works reasonably well but is a little messy and tends to fail at low to moderate impacts. I then tried denting the metal around the magnet on the inside using metal point punch. This works pretty well in Aluminum but in the much harder Titanium it is very difficult to hit the punch hard enough to secure the magnet but not so hard as to crack or break the magnet. This method also tends to fail at moderate impacts. On the last set of impact tests I tried another method: covering the magnet with a small amount of epoxy (the same stuff I use to fill the base). I didn't think this would work very well as you can only fit about 0.05" (1.3 mm) of epoxy above the magnet and still leave room for the USB connector. Fortunately I was completely wrong and the epoxy didn't start cracking until very high impacts, far surpassing the other two methods I tried.
Shipping Things
With the help of my lovely assistant I also figured out the details on how the VIUDs are going to be shipped. Originally I was planning on just using small bubble wrap bags from Canada Post but my wife found a better idea of small cardboard boxes which ended up being a little bit cheaper and looks/works better as well.
Next Week(s)...
While I'm waiting for the Aluminum parts to be anodized I can start finishing the parts for the 100 Titanium VIUDs. I'm also working on getting the details sorted out for the Laser marking.
It has been a busy week or two in VIUD production, although I didn't get as much done as I wanted due to work that needed to get done on www.uesp.net.
More Impact Testing
About 100 more impact tests with the air cannon have been done to test a few different types and methods of epoxy fills in order to improve the VIUD's shock resistance (more on that in a future blog post...soon). I've managed to successfully test speeds over 300 km/h (200 miles/hour) with impact shocks nearing 5000 G which seem to be the limit of what can be accomplished with the current shock testing rig for a couple of reasons. At lower speeds the air gun pressure was roughly linear with the output speed of the VIUD but exceeding 25 psi of pressure the output speed quickly flattens out (see the graph on the right). Since the theoretical terminal velocity of the VIUD is around 200 km/h (120 miles/hour) its going to be difficult to get it to go much faster than this. I may be able to get a little more speed out it by mounting the VIUD in a foam "bullet" to increase the firing efficiency but I don't know exactly how much that will get me.
At these high speeds the impact targets are also taking a good beating. The wood target is beat up pretty well but has survived 100 impacts and can probably take 100 more before needing to be replaced. The stone targets, however, have fared less well...
Stone Targets Destroyed by VIUD Impact Tests
Against the heavier and tougher Titanium VIUD at speeds above 200 km/h (120 miles/hour) a new stone target (left image above) broke after just 4 impact tests. I've since started using a thicker 2" Arkansas Limestone target which is a bit softer but seems to take the hits a bit better. I also seem to have reached a measurement limit with the high-speed camera. The Casio Exilim EX-ZR200 was the cheapest camera I could find that could go up to 1000 fps. This is much faster than most cameras but this speed seems to limit the measured impact accelerations to under 5000 G. At this magnitude the actual impact occurs in well under one frame (<< 1 ms) so it is likely underestimating the actual impact force. I'd love to get a better camera that can do at least 10k fps or better but the ones I've looked at are quite pricey.
Aluminum Case Preparation
Before I can get the remainder of the Aluminum cases anodized there is a fair amount of preparation work needed. In truth, they could probably be anodized as they are and turn out OK but I'd prefer to take a little bit of time and make them better than just "OK". First step was to make a simple jig that can hold the VIUD cap or base securely, quickly, and accurately in the lathe without damaging them. It was relatively straightforward to design and manufacture an Aluminum collet piece sized exactly to the outer diameter of the VIUD.
Simple Jig for Holding a VIUD Cap/Base in the Lathe
Using this jig I increased the size of the cosmetic chamfer on the ends of the cap and base from essentially 0.00" (it was barely what you could call a "broken" edge) to 0.01". While this seems like an insignificant modification it stops this edge from feeling sharp and will help the anodizing from chipping prematurely. Next step is to polish all remaining Aluminum 150 caps and bases. The finished surface as they are is typical dull Aluminum. By polishing to a near mirror finish the resulting anodized surface will be much shinier and it also helps break any remaining sharp edges for a better feel as well as preventing the anodized surface from chipping.
Comparing Original (Left) and Polished (Right) Aluminum VIUD Bodies
Next Week...
I've just started polishing the bodies so that will be my first task next week followed by finishing the VIUD plugs and then cleaning everything. There are more impact tests I'd like to do as well if I have time. The next week will be very busy in UESP related work but stay tuned for more progress reports in a week or two!
The start of another year and the end of another break in the VIUD's story. I wasn't intending on such a long break but there ended up being a lot of maintenance and work that needed doing on UESP.net. Now that I've finally caught up on that work I can begin to focus a bit more on the completing the VIUD.
I'm still basically where I was on the last blog post but the short list is essentially:
Complete detailing/finishing all the cases (in progress).
Order all the parts needed for assembly (mostly done).
Finalize research on the epoxy technique and premature USB failures (more on that in a future blog post).
Figure out a sales platform and all the subsequent details (prices, taxes, shipping).
So still an appreciable amount of work left to do but the end is definitely in sight.
While I've been silent on the VIUD front for the past few months it has been mostly due to waiting for the first 300 VIUD cases (200 Aluminum, 100 Titanium) to finish production. They took a long time to get here but they finally arrived and are looking great!
What 300 VIUD Cases Look Like
Titanium VIUD
Anodized Black Aluminum VIUD
I'd love to say that I'll begin selling VIUDs in the near future but there are just a "few" tasks left before that can happen:
Polish and clean the 150 non-anodized Aluminum.
Anodize the 150 Aluminum sets 3 different colours.
Laser engrave everything with a logo and serial number.
Order all the various parts required for assembly.
Finish testing and finalizing the epoxy type and assembly procedure.
Create a few tools and jigs to help with assembly.
Install 600 magnets.
Create a VIUD shopping site. I'll probably use a service that offers pre-built stores but there is still a good amount of customization and setup to do.
Create a simple assembly and non-conformance tracking database.
Get shipping procedures and costs finalized.
Figure out a sales price for the VIUDs.
Start selling!
Sounds exhausting and while my summer is usually busier than average I hope to be able to finish everything in this list and start selling a few VIUDs this fall. Stay tuned!
In the last post I mentioned finding four new case manufacturers for the VIUD and having a few samples made from each one. To choose one manufacturer for a larger case order we'll have to evaluate/test the samples and pick one that has the best combination of quality and price.
Machining Quality
The easiest test we can do for the case samples is to simply make sure we received what we asked for. We'll measure all the dimensions from the three case pieces (base, cap, and plug) and compare that with the drawing specification for all four manufacturers:
Item
Manufacturer A
Manufacturer B
Manufacturer C
Manufacturer D
Dimensions OK
16 / 32
30 / 32
31 / 32
31 / 32
Dimensions Not OK
8
2
1
1
Dimensions Way Off!
8
0
0
0
Finish
Al - Poor Clear Anodized
Ti - Black?
Al - Natural
Ti - Natural
Al - Clear Anodized
Ti - Natural
Al - Anodized Black
Ti - Natural
Assembly
Threads Don't Fit
OK
OK
OK
Cap chamfer for o-ring too small
Manufacturers B, C, and D all fair well with only a couple minor deviations outside of the expected dimension tolerances (mainly a couple chamfers that were a bit smaller than desired). Manufacturer A, on the other hand, was so bad I had to create a special category just for it. Half of the dimensions were outside of tolerances and some features were outright missing. The threads, or I should say the attempt of threads, were a wonder to behold. All the inside threads were double-started, the screw angles of the exterior threads were wrong and skewed to one side and at least one thread was not square to the body by more than 5°. Even a considerable attempt to restore the threads with a tap and file failed to get them working fully. It is fair to say that Manufacturer A won't be further considered even though they did ship first and didn't charge me anything (I wonder why).
Appearance
The quantitative dimension comparison showed Manufacturers B, C, and D to be very close with each other but how about a more qualitative "appearance" test? Although accurate dimensions are important the case has to look good as well. We can rate a few different appearance factors for each manufacturer:
Item
Manufacturer A
Manufacturer B
Manufacturer C
Manufacturer D
Surface Finish
Very Poor
Very Good
Excellent
Very Good
Knurl Quality
Very Poor
Good
Very Good
Very Good
Assembly Fit
Doesn't Assemble!
Very Good
Good
Acceptable
Overall Appearance
Very Poor
Good
Excellent
Very Good
Ignoring the terrible performance from Manufacturer A, the other three look equally well with C and D slightly leading the pack.
Stress Testing
The final test will be a destructive stress test to failure. The purpose of this test is to determine the type and quality of material used. While I specified very specific alloys (Al 7075-T6 and Ti Grade 5) it is difficult to tell the exact alloy used. It is possible they used a much cheaper alloy (like Al 6061 or Ti Grade 2) or mistakenly used an untempered Aluminum alloy like 7075 instead of 7075-T6. The only way I know to test the alloy, other than a spectrograph, is a stress test to see at what load the item fails.
This will be the first destructive stress test in a long while...the last one was actually the first brass prototype almost two years ago. I've been meaning to destructively test a few from the prototype #5 pre-production test but I have too many non-destructive tests still to do. These tests will validate, or not, the theoretical stress modelling I've done in Autodesk Inventor.
The stress tests will use an assembled unit without any epoxy or USB board. We'll start with the end-to-end stress test in my hydraulic shop press and finish with a side stress test if the unit survives. Note that a value of "> 9 tons" in the following table indicates it didn't fail in the test.
Stress Test
Expected Failure
Manufacturer A
Manufacturer B
Manufacturer C
Manufacturer D
Al : End-To-End
6.5 tons
6.5 tons
6 tons
> 9 tons
> 9 tons
Ti : End-To-End
9 tons
> 9 tons
> 9 tons
> 9 tons
> 9 tons
Al : Side
4 tons
4 tons
4.5 tons
6.5 tons
7 tons
Ti : Side
6 tons
> 9 tons
8 tons
> 9 tons
> 9 tons
The complete video of the stress testing is also available:
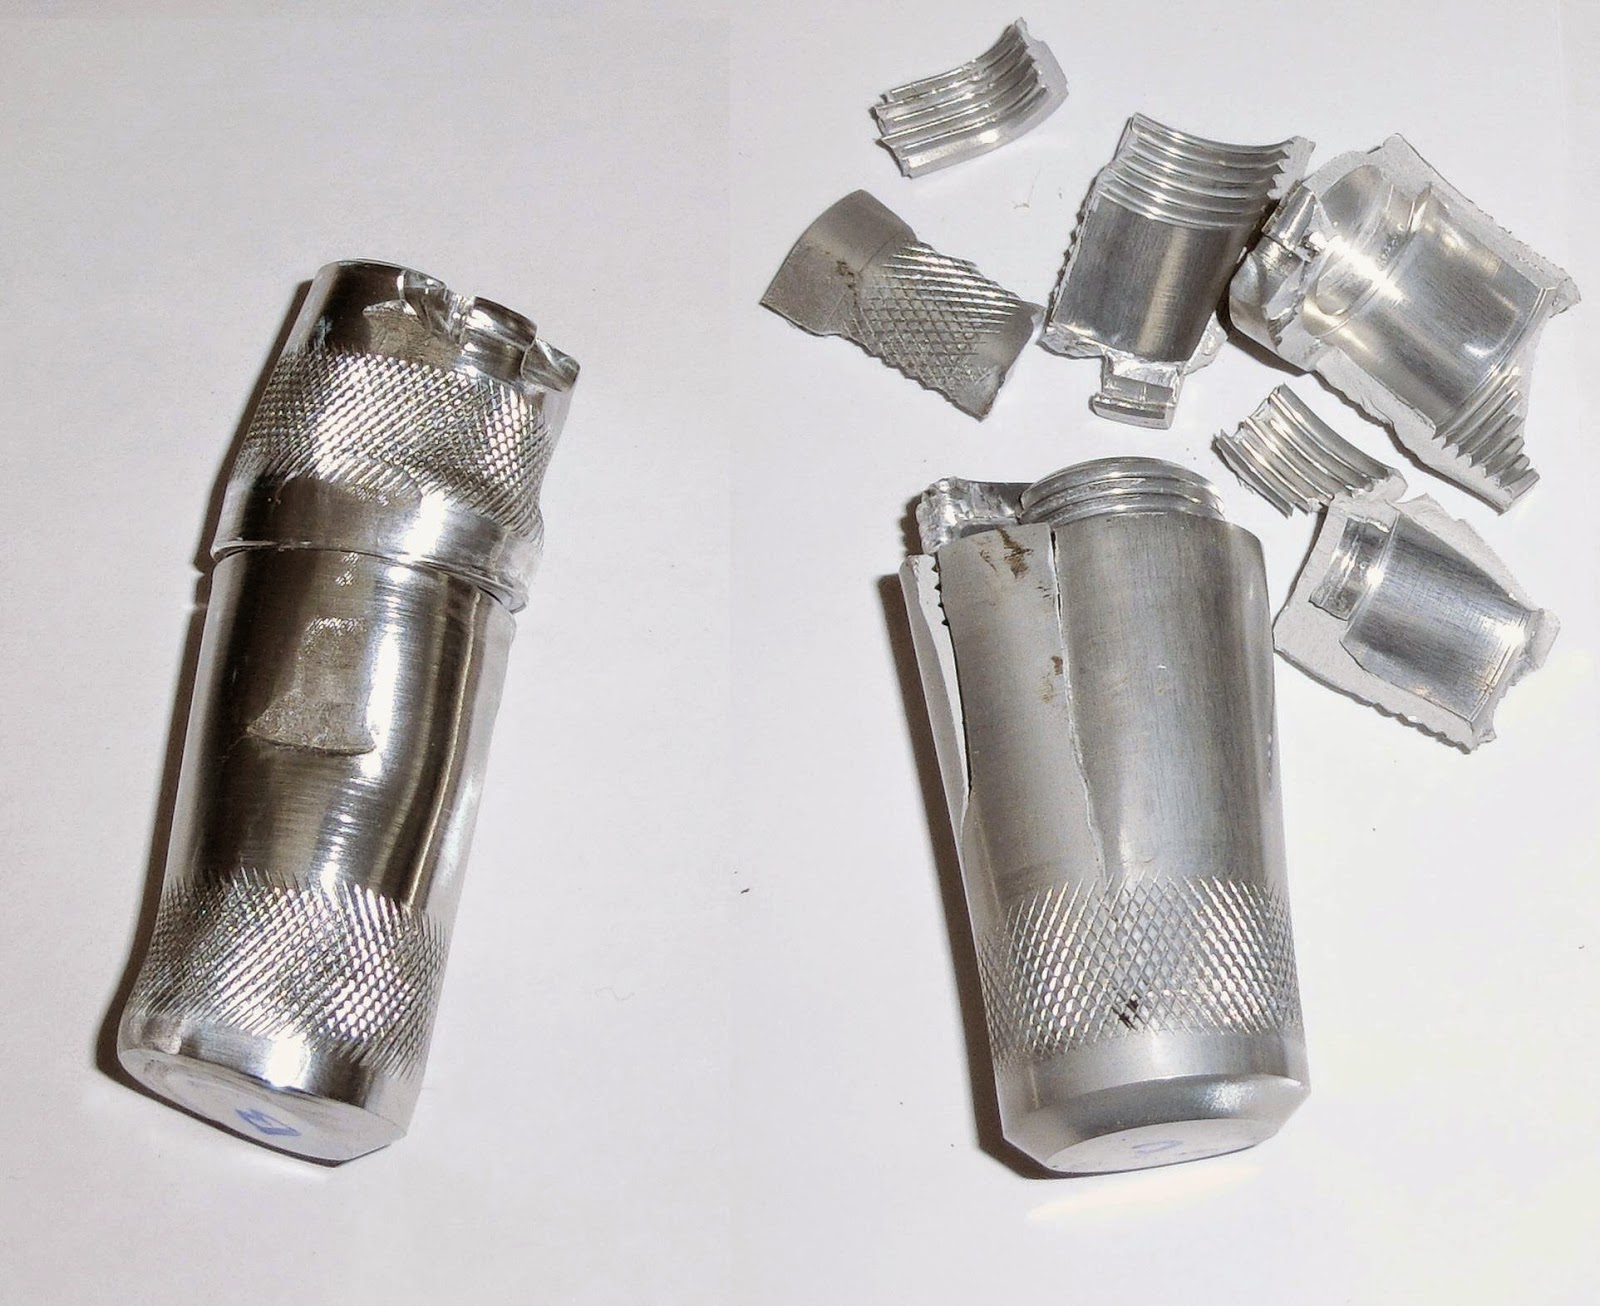
From the stress failure loads and the way the case failed I would say that Manufacturers A and B used a lower strength Aluminum alloy like untempered 7075 or 6061 while Manufacturers C and D used the 7075-T6 alloy as specified. Both A and B failed in a ductile manner (the case deformed slowly and remained in one piece) while both C and D cracked suddenly (see image below). This sudden cracking is typical of a stronger alloy like 7075-T6 or 7068 which are more brittle than other Aluminum alloys.
Comparison of Failures in Lower Strength Aluminum Alloy (Left) and Higher Strength (Right)
Another interesting thing to note is that the cases C and D outperformed the theoretical failure loads by a good margin, at least 50%. The cases failed pretty much where they were expected to fail (cap threads for the end-to-end test) and there were no big surprises. The hole for the lanyard mount did fail in the end-to-end stress test on two cases at high loads but this was expected to happen at some point and the failures were not premature.
Which One?
Considering all case evaluations and tests Manufacturers C and D come out notably ahead of the other two. Manufacturer C has a low lead time but higher price while Manufacturer D has a very long lead time but the cheapest price by a considerable margin. My choice for the first large order will be Manufacturer D, mostly due to the price, but I'll keep C in mind as a backup.
One of the important things I learned from the VIUD's KickStarter was that its price was on the high end so finding a way to reduce that price is now at the top of my list of things to do. At first glance it may appear that there is little that can be done...the prices used on the KickStarter were the lowest I could get them at the time but there are a few areas we can look at and perhaps their combined effect can result in a notable price reduction.
Sales Method
Using KickStarter as the sales method introduces a not insignificant amount of overhead on the price which includes:
KickStarter fee (5%)
Credit card fees (3-5%)
International shipping
If we compare the VIUD's prices from the KickStarter and without this overhead we can see a good sized difference:
Model
KickStarter Price
Base Price
Al 16GB
$199
$151
Al 32GB
$219
$164
Al 64GB
$249
$183
Al 128GB
$299
$241
Al 256GB
$419
$346
Ti 16GB
$319
$250
Ti 32GB
$349
$264
Ti 64GB
$399
$282
Ti 128GB
$449
$340
Ti 256GB
$599
$445
The effect is more significant in the more expensive models...the 256GB Ti is already over $150 cheaper! Technically some of this overhead, namely the credit card and shipping fees, will have to be included at some point but removing them from the VIUD's list price is an important step.
Case Material
We can evaluate the case materials to see if any trade-offs can be made regarding price. The current two case materials, Aluminum 7068-T651 and Titanium Grade 5, were chosen as they are among the highest strength alloys of the respective material. Unfortunately, this also means they are more expensive than other alloys. Comparing a few common alloys:
Alloy
Tensile Strength
Cost
Al 7068-T651
95 kpsi
Low-Medium
Al 7075-T6
75 kpsi
Low
Al 6061
35 kpsi
Low
Ti Grade 5
120 kspi
High
Ti Grade 2
40 kpsi
Medium-High
For the Aluminum VIUD we can consider moving to Al 7075-T6 as this alloy is still very strong and it can make the case manufacturing price a bit cheaper. Experience has also shown that it is much easier to find a machine shop able to source and work with 7075 than 7068. For the Titanium VIUD we will stick with Grade 5 as the more common Grade 2 is significantly weaker and we can have the Titanium VIUDs be a "premium" model to match its higher price.
Case Manufacturer
The VIUD's case is the largest portion of its manufacturing cost comprising 50-80% of its total. I've already sourced a bunch of machine shops for the case production and choose the cheapest one. At least the cheapest one that was able to make the case and not screw up royally. There was one, unmentionable, shop that failed miserably but did offer much lower prices. Perhaps another search and production test will reveal a shop with a lower price but still good quality production. To make a long story short, I found a few dozen potential shops and ordered VIUD case samples from four of them for evaluation purposes. All four shops had lower prices than my previous manufacturer and 3 of the 4 managed to supply cases with pretty decent qualities as seen in the below pictures:
Case Manufacturer A
Case Manufacturer B
Case Manufacturer C
Case Manufacturer D
Three of the manufacturers supplied pretty much identical parts with very good quality. Manufacturer A was the notable exception with completely unusable quality, literally! The threads were so bad they wouldn't screw together even after trying to fix them. You'd think you would want to do your best work when making samples for a potentially larger order.
Potentially Good News....
I still need to fully test the VIUD case samples from the newly sourced manufacturers to make sure the cases are worthy of being used in the world's toughest USB drive, but it looks promising at this point. Based on the average quoted price of the 4 suppliers I should be able to get the list price of the cheapest VIUD model (Al 16GB) well under $100 which should make it much easier to convince people to buy it.
While the VIUD's KickStarter campaign was not successful it was still useful in what I learned in from the process.
Video Making
Prior to starting the campaign I had done basically no video capturing or editing. All KS campaigns require a decent looking introduction video so I started practising by making a variety of VIUD testing and documentation videos which I put on the VIUD's YouTube channel. I quickly found a few important things about making videos:
Lighting -- Even getting half-decent lighting for a simple video can be difficult. Partial sun in the video is no good as it ruins the video's contrast/brightness levels and stands out too much. Direct bright lighting is bad as it tends to reflect off my glasses horribly. I found that using some high-intensity halogen work lights reflecting off a wall or ceiling gave a decent effect with little effort.
Background Sounds -- I didn't realize how loud all the various background sounds could be until I tried to make a few videos. I live near a school, busy road, and plane route and it was a challenge to record a video outside that didn't have some sort of background noise interrupting it.
Public Speaking -- I've never been a good public speaker and that much was obvious from the first few video takes. I've since practised speaking more slowly, carefully pronouncing words and trying to keep the inevitable "ums" and "ahs" to a minimum.
The first few videos definitely took more than a few takes to get just right than the recent ones. I'm particularly proud of the KS campaign video (see below). It won't win any awards and is not as nice as some other KickStarter videos but represents something I couldn't do prior the quest for the VIUD.
VIUD KickStarter Campaign Video
In addition to the video creation I've also had to learn some basic video editing. For now Windows Movie Maker was sufficient to create my basic videos and I've had to learn things like joining movies, transition effects, recording and adding a voice over, sourcing and adding music, and basic credits. Nothing fancy but definitely a little learning curve there. If I had to make more videos I would definitely want to look into getting a better video editor.
Marketing
I'll readily admin that I'm first and foremost an engineer/physicist and have little to no marketing/sales knowledge or experience. While I tried a little promotion of the VIUD shortly before I started its KickStarter campaign I quickly found out I did far too little and much too late. I found a few companies after I launched to help promote the campaign, for a price of course, and I wish I had known about them before hand. One was BackersHub which sends out an email newsletter to inform their clients about KickStarter campaigns and offer deals to some of them. Another one, Ayudos, offered a press release and promotion on their social media accounts. In addition I spent a lot of time after the campaign started trying to contact sites and reporters who might be interested in the VIUD and its story. I also ran a Google AdWords campaign that at least resulted in a lot of traffic to the campaign and blog. Unfortunately, my few attempts at marketing didn't yield very much. In hindsight I should have begun aggressively marketing the VIUD and its KS months before the campaign actually started. This would have given me a much larger audience and a better chance at getting the required funding.
Price
The high price of the VIUD was definitely a significant barrier in getting people interested in purchasing it. Part the problem was that the KickStarter price includes the KS fee, credit card fee, and shipping. For example, the cheapest VIUD (Aluminum 16 GB) might have listed for $150 on an online store with a good profit margin but on KickStarter the additional fees bumped that price up to $199 or more. The $179 early bird price I was offering gave me almost no profit.
Reducing the cost of the VIUD mostly involves reducing the manufacturing cost of the case itself. On the 16 GB model the case is currently 80-90% of the overall manufacturing cost. I've already got quotes from a half-dozen different manufacturing shops and the one I've chosen was actually the cheapest by a good margin. There was a considerably cheaper one but it failed to supply anything usable by a spectacular margin. This leaves me with the unenviable task of looking and trying out a few more case manufacturers to see if I can get a better price.
The Next Step...
After spending a solid two months almost exclusively on the VIUD and its KS campaign I took a short break for a few months in order to get caught up on all the other work I have to do (or had been ignoring in other words). I'll be looking for new suppliers for the manufacturing of the VIUD case to see if I can get the price lower for another attempt.
I've considered trying another KickStarter campaign (you can simply create a new project to try again) but I'm not so sure that KickStarter is a good choice for this type of product. I'm more leaning towards just purchasing a few hundred initial VIUDs and creating a simple web store to sell them from. Either way will take a little more consideration to decide exactly what to do.