Machining Quality
The easiest test we can do for the case samples is to simply make sure we received what we asked for. We'll measure all the dimensions from the three case pieces (base, cap, and plug) and compare that with the drawing specification for all four manufacturers:| Item | Manufacturer A | Manufacturer B | Manufacturer C | Manufacturer D |
|---|---|---|---|---|
Dimensions OK
|
16 / 32
|
30 / 32
|
31 / 32
|
31 / 32
|
Dimensions Not OK
|
8
|
2
|
1
|
1
|
Dimensions Way Off!
|
8
|
0
|
0
|
0
|
Finish
|
Al - Poor Clear Anodized
Ti - Black?
|
Al - Natural
Ti - Natural
|
Al - Clear Anodized
Ti - Natural
|
Al - Anodized Black
Ti - Natural
|
Assembly
|
Threads Don't Fit
|
OK
|
OK
|
OK
Cap chamfer for o-ring too small
|
Manufacturers B, C, and D all fair well with only a couple minor deviations outside of the expected dimension tolerances (mainly a couple chamfers that were a bit smaller than desired). Manufacturer A, on the other hand, was so bad I had to create a special category just for it. Half of the dimensions were outside of tolerances and some features were outright missing. The threads, or I should say the attempt of threads, were a wonder to behold. All the inside threads were double-started, the screw angles of the exterior threads were wrong and skewed to one side and at least one thread was not square to the body by more than 5°. Even a considerable attempt to restore the threads with a tap and file failed to get them working fully. It is fair to say that Manufacturer A won't be further considered even though they did ship first and didn't charge me anything (I wonder why).
Appearance
The quantitative dimension comparison showed Manufacturers B, C, and D to be very close with each other but how about a more qualitative "appearance" test? Although accurate dimensions are important the case has to look good as well. We can rate a few different appearance factors for each manufacturer:| Item | Manufacturer A | Manufacturer B | Manufacturer C | Manufacturer D |
|---|---|---|---|---|
Surface Finish
|
Very Poor
|
Very Good
|
Excellent
|
Very Good
|
Knurl Quality
|
Very Poor
|
Good
|
Very Good
|
Very Good
|
Assembly Fit
|
Doesn't Assemble!
|
Very Good
|
Good
|
Acceptable
|
Overall Appearance
|
Very Poor
|
Good
|
Excellent
|
Very Good
|
Ignoring the terrible performance from Manufacturer A, the other three look equally well with C and D slightly leading the pack.
Stress Testing
The final test will be a destructive stress test to failure. The purpose of this test is to determine the type and quality of material used. While I specified very specific alloys (Al 7075-T6 and Ti Grade 5) it is difficult to tell the exact alloy used. It is possible they used a much cheaper alloy (like Al 6061 or Ti Grade 2) or mistakenly used an untempered Aluminum alloy like 7075 instead of 7075-T6. The only way I know to test the alloy, other than a spectrograph, is a stress test to see at what load the item fails.This will be the first destructive stress test in a long while...the last one was actually the first brass prototype almost two years ago. I've been meaning to destructively test a few from the prototype #5 pre-production test but I have too many non-destructive tests still to do. These tests will validate, or not, the theoretical stress modelling I've done in Autodesk Inventor.
The stress tests will use an assembled unit without any epoxy or USB board. We'll start with the end-to-end stress test in my hydraulic shop press and finish with a side stress test if the unit survives. Note that a value of "> 9 tons" in the following table indicates it didn't fail in the test.
| Stress Test | Expected Failure | Manufacturer A | Manufacturer B | Manufacturer C | Manufacturer D |
|---|---|---|---|---|---|
Al : End-To-End
|
6.5 tons
|
6.5 tons
|
6 tons
|
> 9 tons
|
> 9 tons
|
Ti : End-To-End
|
9 tons
|
> 9 tons
|
> 9 tons
|
> 9 tons
| > 9 tons |
Al : Side
|
4 tons
|
4 tons
|
4.5 tons
|
6.5 tons
|
7 tons
|
Ti : Side
|
6 tons
|
> 9 tons
|
8 tons
|
> 9 tons
|
> 9 tons
|
The complete video of the stress testing is also available:
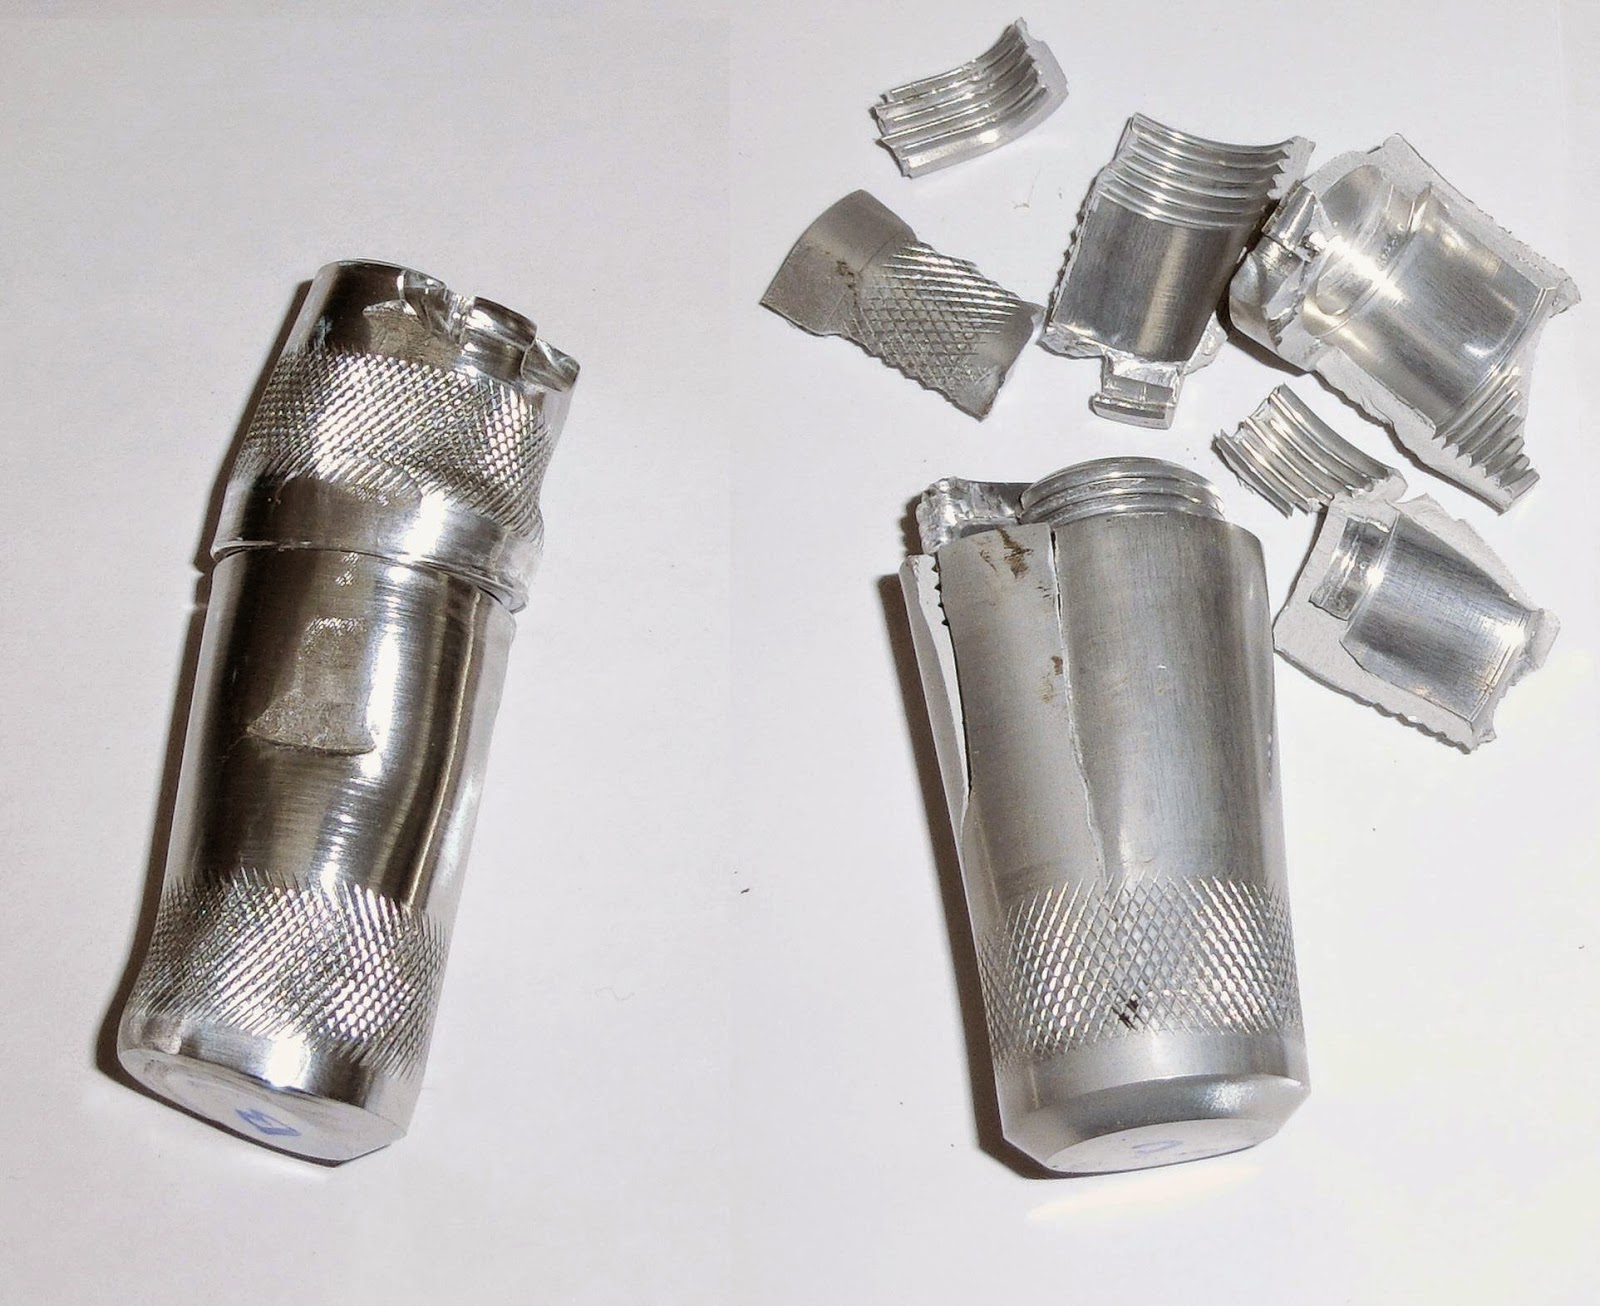
From the stress failure loads and the way the case failed I would say that Manufacturers A and B used a lower strength Aluminum alloy like untempered 7075 or 6061 while Manufacturers C and D used the 7075-T6 alloy as specified. Both A and B failed in a ductile manner (the case deformed slowly and remained in one piece) while both C and D cracked suddenly (see image below). This sudden cracking is typical of a stronger alloy like 7075-T6 or 7068 which are more brittle than other Aluminum alloys.
 |
| Comparison of Failures in Lower Strength Aluminum Alloy (Left) and Higher Strength (Right) |
Another interesting thing to note is that the cases C and D outperformed the theoretical failure loads by a good margin, at least 50%. The cases failed pretty much where they were expected to fail (cap threads for the end-to-end test) and there were no big surprises. The hole for the lanyard mount did fail in the end-to-end stress test on two cases at high loads but this was expected to happen at some point and the failures were not premature.
