After a month of preparation and worrying about all the little details I'm happy to announce that the VIUD store is now open at:
So go and check it out and even if you don't decide to buy anything feel free to leave me comments and suggestions!

The quest for the World's Toughest USB drive.
Showing posts with label news. Show all posts
Showing posts with label news. Show all posts
Monday, September 5, 2016

Tuesday, August 9, 2016
Product Shots!
Work on creating the VIUD store started last week and I'm already well on my way to getting it finished. I decided to go with Shopify as it seems to be a good sized Canadian online e-commerce system with the features I need.
I've spent the better part of the last week taking and preparing product shots of all the various VIUD models for use in the store. There are a lot of good online guides for taking product shots but to summarize what I've used:


I've spent the better part of the last week taking and preparing product shots of all the various VIUD models for use in the store. There are a lot of good online guides for taking product shots but to summarize what I've used:
- Niken D90 camera with SB-600 flash
- Small light tent
- Piece of white paper over the flash to disperse flash and soften shadows
- A few extra lights to get better shadow and reflections (some "real" camera lights would be very nice but I've made do)
- About half-zoomed in on the lens
- Auto color balance on the camera
- Manual mode on the camera with a high aperture (F20) for a larger depth of field
- Adjust the exposure time and bias to get a good picture (white background without too much shadow)
- Adjust the picture's brightness, contrast, and saturation afterwards to get a realistic and good looking image
The shots turned out pretty good and I think they can speak for themselves!


Wednesday, August 3, 2016
Getting Closer...
So my summer vacation is unfortunately over and I'm getting back into the finishing stages of the VIUD preparation. All I can do before actually selling them is to do the coating of all the USB boards I currently have.
Through all the various testing I've done, mainly the shock testing, I've narrowed down a good combination of coatings and epoxies that seems to maximize the durability of the USB. I start with two layers of Silicon conformal coating.
This is thin, flexible coating that gets into all the small nooks and crannies on the circuit board and even by itself seems to help a lot in minimizing damage caused by shock. Each coat requires at least a day to dry out.
Once the two conformal coatings are dry it is time for another two coatings of a thicker and more flexible insulating coating.
This gives the USB circuit board a considerably thicker and flexible coat to help absorb even more shock. It also helps prevent epoxy from leaking through the USB connector and making a considerable mess which is difficult and time consuming to clean up. Like the conformal coating each insulating coating takes a day to dry.
Next step is to just create an online store and actually start selling things!
Through all the various testing I've done, mainly the shock testing, I've narrowed down a good combination of coatings and epoxies that seems to maximize the durability of the USB. I start with two layers of Silicon conformal coating.
 |
| Silicon Conformal Coating a USB |
This is thin, flexible coating that gets into all the small nooks and crannies on the circuit board and even by itself seems to help a lot in minimizing damage caused by shock. Each coat requires at least a day to dry out.
 |
| Drying Out the Conformal Coating |
Once the two conformal coatings are dry it is time for another two coatings of a thicker and more flexible insulating coating.
 |
| Coating a USB in Insulating Varnish |
 |
| Drying Out the Insulating Coating |
Next step is to just create an online store and actually start selling things!
Friday, April 29, 2016
Week(s) in Review: 29 April 2016
In the past month or so I've finally managed to complete finishing the Titanium bases and have all bases laser engraved with the VIUD logo and serial number and they're looking great!

 I also experimented with custom logo/text and it worked out very well but the price point to have it done is unfortunately large enough to make it only worthwhile for larger quantities (say 10 or more).
There's not much left to do! I can conformal coat all the USB boards and then find, design and setup an online store. Unfortunately, it looks as though I may be away all summer which will put another delay in the VIUD progress but it won't be long now!


 |
| Custom Logo and Text Example |
There's not much left to do! I can conformal coat all the USB boards and then find, design and setup an online store. Unfortunately, it looks as though I may be away all summer which will put another delay in the VIUD progress but it won't be long now!
Monday, March 14, 2016
Week(s) in Review: 14 March 2016
Its been a busy month for me in other projects, particularly with the release of the Thieves Guild DLC for Elder Scrolls Online.
Besides a little bit of label preparation the only other news to note is that the anodized cases have arrived and they look great!
Next steps are to polish the Titanium bases so I can have the VIUD logo and serial number Laser engraved. After that we are ready to start actually selling things!
Besides a little bit of label preparation the only other news to note is that the anodized cases have arrived and they look great!
 |
| Titanium VIUD (Left) and 4 Anodized Aluminum Colors |
 |
Tuesday, February 16, 2016
Week(s) in Review...16 February 2016
Its been a very busy week or two for me with both VIUD and non-VIUD related projects....
 I'm happy to say that the 150 Aluminum VIUD's are finally off to anodizing! The polishing of the bodies went well with no unforeseen issues. The preparation of the plugs took a little longer than expected. Originally I was looking into buying or making a broaching set for squaring the rounded inside corners of the plug. However, I decided to simply file the corners by grinding a small square file to be the exact width of the hole and making a simple handle to hold the file. Filing the Aluminum plugs took some time but was relatively easy and we'll see if the same holds for the Titanium plugs. I wasn't going to polish the plugs but the filing created a sharp edge which was good to get rounded with a quick buffing.
Next step was cleaning everything. The buffing process caked a considerable amount of debris in all the nooks and crannies of the parts so I soaked everything for a day in Mineral Spirits and then brushed/wiped each part and left it to dry.
For this production run I'm doing four basic colors for the Aluminum VIUDs:
Fortunately I think I'm done with impact testing for now as I don't know what I can actually use for a stone target that won't break on me...perhaps a really thick custom made concrete pad with rebar reinforcement.
The Aluminum VIUD managed to survive up to impact speeds of 230 km/hr on the stone target which seems to be the typical failure point for the modified epoxy technique. The Titanium VIUD broke a new record by surviving impact speeds up to 250 km/hr on the stone target which is rather incredible when you think about it let alone experience the violent event itself.
I then tried denting the metal around the magnet on the inside using metal point punch. This works pretty well in Aluminum but in the much harder Titanium it is very difficult to hit the punch hard enough to secure the magnet but not so hard as to crack or break the magnet. This method also tends to fail at moderate impacts.
On the last set of impact tests I tried another method: covering the magnet with a small amount of epoxy (the same stuff I use to fill the base). I didn't think this would work very well as you can only fit about 0.05" (1.3 mm) of epoxy above the magnet and still leave room for the USB connector. Fortunately I was completely wrong and the epoxy didn't start cracking until very high impacts, far surpassing the other two methods I tried.
With the help of my lovely assistant I also figured out the details on how the VIUDs are going to be shipped. Originally I was planning on just using small bubble wrap bags from Canada Post but my wife found a better idea of small cardboard boxes which ended up being a little bit cheaper and looks/works better as well.
Aluminum Anodizing
 I'm happy to say that the 150 Aluminum VIUD's are finally off to anodizing! The polishing of the bodies went well with no unforeseen issues. The preparation of the plugs took a little longer than expected. Originally I was looking into buying or making a broaching set for squaring the rounded inside corners of the plug. However, I decided to simply file the corners by grinding a small square file to be the exact width of the hole and making a simple handle to hold the file. Filing the Aluminum plugs took some time but was relatively easy and we'll see if the same holds for the Titanium plugs. I wasn't going to polish the plugs but the filing created a sharp edge which was good to get rounded with a quick buffing.
Next step was cleaning everything. The buffing process caked a considerable amount of debris in all the nooks and crannies of the parts so I soaked everything for a day in Mineral Spirits and then brushed/wiped each part and left it to dry.
For this production run I'm doing four basic colors for the Aluminum VIUDs:
- Black (already done)
- Red
- Blue
- Green
A Little More Impact Testing....
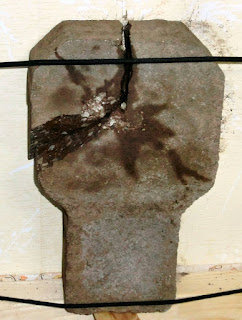
I did another run of impact testing with a new set of USB circuit boards and a modified epoxy filling technique to ensure everything works as expected and there are no premature failures. Fortunately, the VIUDs fared better than my new stone target which broke clean in half while testing the Titanium VIUD at speeds above 200 km/hr. |
| Another Broken Stone Target |
The Aluminum VIUD managed to survive up to impact speeds of 230 km/hr on the stone target which seems to be the typical failure point for the modified epoxy technique. The Titanium VIUD broke a new record by surviving impact speeds up to 250 km/hr on the stone target which is rather incredible when you think about it let alone experience the violent event itself.
Cap Magnets
I've always been trying to figure the best way to secure the magnets in the cap. Initially I tried superglue which works reasonably well but is a little messy and tends to fail at low to moderate impacts.I then tried denting the metal around the magnet on the inside using metal point punch. This works pretty well in Aluminum but in the much harder Titanium it is very difficult to hit the punch hard enough to secure the magnet but not so hard as to crack or break the magnet. This method also tends to fail at moderate impacts.
On the last set of impact tests I tried another method: covering the magnet with a small amount of epoxy (the same stuff I use to fill the base). I didn't think this would work very well as you can only fit about 0.05" (1.3 mm) of epoxy above the magnet and still leave room for the USB connector. Fortunately I was completely wrong and the epoxy didn't start cracking until very high impacts, far surpassing the other two methods I tried.
 Shipping Things
With the help of my lovely assistant I also figured out the details on how the VIUDs are going to be shipped. Originally I was planning on just using small bubble wrap bags from Canada Post but my wife found a better idea of small cardboard boxes which ended up being a little bit cheaper and looks/works better as well. 
Next Week(s)...
While I'm waiting for the Aluminum parts to be anodized I can start finishing the parts for the 100 Titanium VIUDs. I'm also working on getting the details sorted out for the Laser marking.Saturday, January 30, 2016
Week in Review...30 January 2016
It has been a busy week or two in VIUD production, although I didn't get as much done as I wanted due to work that needed to get done on www.uesp.net.
At lower speeds the air gun pressure was roughly linear with the output speed of the VIUD but exceeding 25 psi of pressure the output speed quickly flattens out (see the graph on the right). Since the theoretical terminal velocity of the VIUD is around 200 km/h (120 miles/hour) its going to be difficult to get it to go much faster than this. I may be able to get a little more speed out it by mounting the VIUD in a foam "bullet" to increase the firing efficiency but I don't know exactly how much that will get me.

At these high speeds the impact targets are also taking a good beating. The wood target is beat up pretty well but has survived 100 impacts and can probably take 100 more before needing to be replaced. The stone targets, however, have fared less well...

Against the heavier and tougher Titanium VIUD at speeds above 200 km/h (120 miles/hour) a new stone target (left image above) broke after just 4 impact tests. I've since started using a thicker 2" Arkansas Limestone target which is a bit softer but seems to take the hits a bit better.
I also seem to have reached a measurement limit with the high-speed camera. The Casio Exilim EX-ZR200 was the cheapest camera I could find that could go up to 1000 fps. This is much faster than most cameras but this speed seems to limit the measured impact accelerations to under 5000 G. At this magnitude the actual impact occurs in well under one frame (<< 1 ms) so it is likely underestimating the actual impact force. I'd love to get a better camera that can do at least 10k fps or better but the ones I've looked at are quite pricey.
First step was to make a simple jig that can hold the VIUD cap or base securely, quickly, and accurately in the lathe without damaging them. It was relatively straightforward to design and manufacture an Aluminum collet piece sized exactly to the outer diameter of the VIUD.
Using this jig I increased the size of the cosmetic chamfer on the ends of the cap and base from essentially 0.00" (it was barely what you could call a "broken" edge) to 0.01". While this seems like an insignificant modification it stops this edge from feeling sharp and will help the anodizing from chipping prematurely.
Next step is to polish all remaining Aluminum 150 caps and bases. The finished surface as they are is typical dull Aluminum. By polishing to a near mirror finish the resulting anodized surface will be much shinier and it also helps break any remaining sharp edges for a better feel as well as preventing the anodized surface from chipping.
More Impact Testing
About 100 more impact tests with the air cannon have been done to test a few different types and methods of epoxy fills in order to improve the VIUD's shock resistance (more on that in a future blog post...soon). I've managed to successfully test speeds over 300 km/h (200 miles/hour) with impact shocks nearing 5000 G which seem to be the limit of what can be accomplished with the current shock testing rig for a couple of reasons.At lower speeds the air gun pressure was roughly linear with the output speed of the VIUD but exceeding 25 psi of pressure the output speed quickly flattens out (see the graph on the right). Since the theoretical terminal velocity of the VIUD is around 200 km/h (120 miles/hour) its going to be difficult to get it to go much faster than this. I may be able to get a little more speed out it by mounting the VIUD in a foam "bullet" to increase the firing efficiency but I don't know exactly how much that will get me.


Stone Targets Destroyed by VIUD Impact Tests
Against the heavier and tougher Titanium VIUD at speeds above 200 km/h (120 miles/hour) a new stone target (left image above) broke after just 4 impact tests. I've since started using a thicker 2" Arkansas Limestone target which is a bit softer but seems to take the hits a bit better.
I also seem to have reached a measurement limit with the high-speed camera. The Casio Exilim EX-ZR200 was the cheapest camera I could find that could go up to 1000 fps. This is much faster than most cameras but this speed seems to limit the measured impact accelerations to under 5000 G. At this magnitude the actual impact occurs in well under one frame (<< 1 ms) so it is likely underestimating the actual impact force. I'd love to get a better camera that can do at least 10k fps or better but the ones I've looked at are quite pricey.
Aluminum Case Preparation
Before I can get the remainder of the Aluminum cases anodized there is a fair amount of preparation work needed. In truth, they could probably be anodized as they are and turn out OK but I'd prefer to take a little bit of time and make them better than just "OK".First step was to make a simple jig that can hold the VIUD cap or base securely, quickly, and accurately in the lathe without damaging them. It was relatively straightforward to design and manufacture an Aluminum collet piece sized exactly to the outer diameter of the VIUD.
 |
| Simple Jig for Holding a VIUD Cap/Base in the Lathe |
Using this jig I increased the size of the cosmetic chamfer on the ends of the cap and base from essentially 0.00" (it was barely what you could call a "broken" edge) to 0.01". While this seems like an insignificant modification it stops this edge from feeling sharp and will help the anodizing from chipping prematurely.
Next step is to polish all remaining Aluminum 150 caps and bases. The finished surface as they are is typical dull Aluminum. By polishing to a near mirror finish the resulting anodized surface will be much shinier and it also helps break any remaining sharp edges for a better feel as well as preventing the anodized surface from chipping.
 |
| Comparing Original (Left) and Polished (Right) Aluminum VIUD Bodies |
Next Week...
I've just started polishing the bodies so that will be my first task next week followed by finishing the VIUD plugs and then cleaning everything. There are more impact tests I'd like to do as well if I have time. The next week will be very busy in UESP related work but stay tuned for more progress reports in a week or two!Monday, January 11, 2016
The Start of Another Year
The start of another year and the end of another break in the VIUD's story. I wasn't intending on such a long break but there ended up being a lot of maintenance and work that needed doing on UESP.net. Now that I've finally caught up on that work I can begin to focus a bit more on the completing the VIUD.
I'm still basically where I was on the last blog post but the short list is essentially:
I'm still basically where I was on the last blog post but the short list is essentially:
- Complete detailing/finishing all the cases (in progress).
- Order all the parts needed for assembly (mostly done).
- Finalize research on the epoxy technique and premature USB failures (more on that in a future blog post).
- Figure out a sales platform and all the subsequent details (prices, taxes, shipping).
So still an appreciable amount of work left to do but the end is definitely in sight.
Friday, November 14, 2014
KickStarter Campaign Over
The VIUD's KickStarter campaign finished this morning and, unfortunately, we didn't reach our funding target. While I'm disappointed, the entire experience was educating and I received a lot of great feedback to sort through. Development of the VIUD continues with the primary goal of reducing the manufacturing cost to get its retail price a low as possible.
Keep tuned to the blog for future VIUD news and development posts including a post-mortem review of the entire KickStarter experience.
Keep tuned to the blog for future VIUD news and development posts including a post-mortem review of the entire KickStarter experience.
Wednesday, October 15, 2014


Wednesday, October 8, 2014
Reddit AMA - 9 October 2014

Saturday, September 27, 2014
Good News Everyone!
I've been busy over the last few weeks getting back up to full speed in the VIUD design and testing and there have been a few important things to note.
Most significantly, I contacted my USB circuit board supplier to check on prices and they have managed to drop by almost 50% since last year. This doesn't make too much difference on the 16/32 GB model prices but drops the final price on the expensive 256 GB by over $100!
I've started to record some videos and figure out video editing. This is definitely outside of my comfort zone but I'm having fun learning something new. Look for some new testing videos here in the near future.
I've also finally figured out and solved an issue with some USBs failing in the VIUDs after assembly. Look for a blog post on this subject in the next few days.
Last but not least, I've created an account on KickStarter and have been playing around with creating a project. I must say their web interface is one of the better ones I've used. I hope to launch the VIUD's KickStarter in a few weeks, after I record a few more test videos, so stay tuned!
Most significantly, I contacted my USB circuit board supplier to check on prices and they have managed to drop by almost 50% since last year. This doesn't make too much difference on the 16/32 GB model prices but drops the final price on the expensive 256 GB by over $100!
I've started to record some videos and figure out video editing. This is definitely outside of my comfort zone but I'm having fun learning something new. Look for some new testing videos here in the near future.
I've also finally figured out and solved an issue with some USBs failing in the VIUDs after assembly. Look for a blog post on this subject in the next few days.
Last but not least, I've created an account on KickStarter and have been playing around with creating a project. I must say their web interface is one of the better ones I've used. I hope to launch the VIUD's KickStarter in a few weeks, after I record a few more test videos, so stay tuned!
Subscribe to:
Posts (Atom)