Wednesday, February 19, 2020

Burn-In Speed Testing

A prospective VIUD buyer recently asked me this question:
How well are the read/write times in comparison to market stock times? I have a SanDisk, but for the life of me they don't post read times, and it slows down in the middle of large projects. ... When it gets hot my progress slows down by a whole addition hour.
An interesting question that I didn't have the exact answer to. I've done a lot of basic, short-term speed testing and a couple of very long (weeks) burn-in tests for error checking, but no tests to see if the USB speed varied over a long term or to measure how hot the VIUD gets.

Testing

The basic setup was to just continually write to a VIUD over a period of about a day (continually copy a 4GB file to the drive) and do a couple of speed tests over that period to see if there was any variation. The continuous writing to the drive was paused while the speed tests were performed.

Since the original question may be related to drive temperature I also measured the temperature of the case. The tests were done for both an Aluminum (32GB) and Titanium (256GB) drive.

Results

Results are shown the below tables.

Time Case Temp Read Speed Write Speed
0 hr
23°C
155.4 MB/s
98.1 MB/s
0.5 hr
27°C


2.5 hrs
33°C


5.7 hrs
35°C


8.5 hrs
37°C
157.0 MB/s
89.2 MB/s
21.3 hrs
37°C
156.8 MB/s
89.3 MB/s
28.3 hrs
36°C
155.1 MB/s
87.2 MB/s
Burn-In Speed Test for Titanium 256GB VIUD

TimeCase TempRead SpeedWrite Speed
0 hr
22°C
142.1 MB/s
28.5 MB/s
4.2 hrs
30°C
142.9 MB/s
28.6 MB/s
17.5 hrs
28°C
143.5 MB/s
28.3 MB/s
27.3 hrs
29°C
141.2 MB/s
18.1 MB/s
Burn-In Speed Test for Aluminum 32GB VIUD

In read/write speeds are the sequential speeds obtained from the CrystalDiskMark benchmarks. While there is some variation in the read tests it is within what we would expect the normal variation to be. The write tests show a small drop (9%) in the write speed for the Titanium drive. For the Aluminum drive the last write speed test shows a significant (36%) drop in write speed although I'm not sure I believe that data point or not as the HD Tune Pro results showed no significant speed decrease in any test for either VIUD.

For the temperature testing the ambient temperature was around 20°C for all tests. The temperature was measured where it was the highest value on the drive which tended to be the USB connector.

I also did some quick tests on a Sandisk Extreme 16GB USB drive. Temperatures were similar to the Titanium VIUD and no speed degradation was observed.

In terms of qualitative results, the Titanium VIUD gets very warm but not uncomfortable to the touch, similar to a normal USB drive. The Aluminum VIUD gets just a little warm to the touch.


Theory

The potential reason a typical consumer USB drive might overheat and a VIUD might not can be explained by looking at the thermal conductivities of the relevant materials.

Material Thermal Conductivity
Air
0.025 W/mK
Epoxy
0.3 W/mK
Titanium
20 W/mK
Aluminum
205 W/mK

In a consumer USB drive the circuit board is surrounded by air trapped inside the case which has a very low thermal conductivity thus trapping the heat near the board and causing to it to reach a high temperature. In a VIUD drive the circuit board is surrounded by epoxy which has 10x the thermal conductivity than air which enables it to direct the heat away from the board and into the metal case and air. In addition, the VIUD drive has the USB metal connector in close contact to the metal plug which further helps conduct the heat away from the USB.

Discussion

Compared to a normal USB the Titanium VIUD reached a similar temperature on the USB metal connector (37°C). How this translates to the interior circuit board temperature is unknown...we would expect the epoxy encased VIUD to be somewhat cooler than an air encased USB but by exactly how much would require more advanced temperature modeling.

The Aluminum VIUD was noticeably cooler on the USB metal connector (30°C) and would be the choice if long term reading/writing and overheating of the USB was a concern.

Monday, September 5, 2016

The VIUD Store is Now Open!

After a month of preparation and worrying about all the little details I'm happy to announce that the VIUD store is now open at:


So go and check it out and even if you don't decide to buy anything feel free to leave me comments and suggestions!

Monday, August 15, 2016

Updated USB Specifications

Last week was spent updating the VIUD specifications on the new store site which includes a number of values related to the USB (read on for an explanation of each benchmark):


16 GB 32 GB 64 GB 128 GB 256 GB
Usable Capacity
15,961,546,752 bytes
31,651,479,552 bytes
62,911,414,272 bytes
125,818,503,168 bytes
253,121,003,520 bytes
File System
FAT32
FAT32
exFAT
exFAT
exFAT
HD Tune Pro Benchmarks
Read
106.5 - 116.7 MB/s
114.2 - 127.9 MB/s
119.9 - 130.7 MB/s
181.2 - 193.3 MB/s
56.0 - 146.8 MB/s
Average Read
111.7 MB/s
121.9 MB/s
123.5 MB/s
187.7 MB/s
142.1 MB/s
Access Time
0.889 ms
0.973 ms
1.16 ms
0.747 ms
0.811 ms
Crystal Disk Mark Benchmarks
Read Seq Thread
121.6 MB/s
130.1 MB/s
133.3 MB/s
208.8 MB/s
149.2 MB/s
Read Rnd Thread
16.4 MB/s
14.3 MB/s
14.1 MB/s
6.03 MB/s
22.1 MB/s
Read Seq
119.8 MB/s
127.6 MB/s
131.6 MB/s
205.4 MB/s
146.6 MB/s
Read Rnd
15.0 MB/s
13.3 MB/s
13.6 MB/s
5.47 MB/s
19.2 MB/s
Write Seq Thread
24.2 MB/s
34.8 MB/s
38.2 MB/s
132.5 MB/s
94.1 MB/s
Write Rnd Thread
0.051 MB/s
0.097 MB/s
0.69 MB/s
0.224 MB/s
1.37 MB/s
Write Seq
22.4 MB/s
25.6 MB/s
17.8 MB/s
129.8 MB/s
22.6 MB/s
Write Rnd
0.054 MB/s
0.055 MB/s
0.81 MB/s
0.0048 MB/s
1.07 MB/s
USBFlashBench Benchmarks
Read
116.70 MB/s
124.93 MB/s
127.54 MB/s
206.48 MB/s
131.13 MB/s
Write
22.72 MB/s
29.40 MB/s
32.89 MB/s
133.83 MB/s
55.93 MB/s
Link
4GB File Copy
Copy
2:38.3 (24.1 MB/s)
1:49.5 (34.8 MB/s)
1:42.1 (37.3 MB/s)
0:30.2 (126.3 MB/s)
0:44.8 (85.2 MB/s)
Read
0:33.4 (114.1 MB/s)
0:31.2 (122.1 MB/s)
0:30.6 (124.6 MB/s)
0:18.4 (206.9 MB/s)
0:28.8 (132.7 MB/s)


The VIUD's usable capacity is slightly less than the stated capacity which is typical of just about any mass storage device. Part of the overall device's drive space is taken up by the file allocation table which takes more space on larger drives. The other part, however, is just due to the USB board manufacturer using a slightly smaller size than stated. Perhaps this is due to a technical reason or, more likely, an economic one.

HD Tune Pro is a basic disk benchmarking and testing application. Unfortunately the write tests don't seem to work on newer operating systems but the read and error tests do give a nice visual display. I'd like to point out the low minimum read speed for the 256 GB VIUD which can be easily seen in the following graph:


VIUD 256 GB HDTunePro Read Benchmark
All other VIUD capacities have a roughly flat graph for the blue line but the 256 GB model has much slower read speeds at exactly 32 GB intervals for whatever reason.

CrystalDiskMark is another basic drive benchmarking tool that outputs several read and write tests:
  • Seq Thread = Sequential read/write, 128 KB block size with multiple queues and threads
  • Rnd Thread = Random read/write, 4 KB block size with multiple queues and threads
  • Seq = Sequential read/write, 1 MB block size with single thread
  • Rnd = Random read/write, 4KB block size with single thread

USBFlashBench is a simple tool that tests multiple block read/write sizes and then uploads the results to a website and creates nice graphs like:

USBFlashBench Results for the 256 GB VIUD
Finally, the 4GB file copy test is simply the time it takes to copy a 4 GB (4,000,000,000 bytes) file composed of random content to the VIUD and the time it takes to read it back. Due to caching we have to make sure to unplug the VIUD after the write test and then plug it back in to do the read test.

Tuesday, August 9, 2016

Product Shots!

Work on creating the VIUD store started last week and I'm already well on my way to getting it finished. I decided to go with Shopify as it seems to be a good sized Canadian online e-commerce system with the features I need.

I've spent the better part of the last week taking and preparing product shots of all the various VIUD models for use in the store. There are a lot of good online guides for taking product shots but to summarize what I've used:

  • Niken D90 camera with SB-600 flash
  • Small light tent
  • Piece of white paper over the flash to disperse flash and soften shadows
  • A few extra lights to get better shadow and reflections (some "real" camera lights would be very nice but I've made do)
  • About half-zoomed in on the lens
  • Auto color balance on the camera
  • Manual mode on the camera with a high aperture (F20) for a larger depth of field
  • Adjust the exposure time and bias to get a good picture (white background without too much shadow)
  • Adjust the picture's brightness, contrast, and saturation afterwards to get a realistic and good looking image

The shots turned out pretty good and I think they can speak for themselves!


Wednesday, August 3, 2016

Getting Closer...

So my summer vacation is unfortunately over and I'm getting back into the finishing stages of the VIUD preparation. All I can do before actually selling them is to do the coating of all the USB boards I currently have.

Through all the various testing I've done, mainly the shock testing, I've narrowed down a good combination of coatings and epoxies that seems to maximize the durability of the USB. I start with two layers of Silicon conformal coating.

Silicon Conformal Coating a USB

This is thin, flexible coating that gets into all the small nooks and crannies on the circuit board and even by itself seems to help a lot in minimizing damage caused by shock. Each coat requires at least a day to dry out.

Drying Out the Conformal Coating

Once the two conformal coatings are dry it is time for another two coatings of a thicker and more flexible insulating coating.

Coating a USB in Insulating Varnish
This gives the USB circuit board a considerably thicker and flexible coat to help absorb even more shock. It also helps prevent epoxy from leaking through the USB connector and making a considerable mess which is difficult and time consuming to clean up. Like the conformal coating each insulating coating takes a day to dry.

Drying Out the Insulating Coating

Next step is to just create an online store and actually start selling things! 

Friday, April 29, 2016

Week(s) in Review: 29 April 2016

In the past month or so I've finally managed to complete finishing the Titanium bases and have all bases laser engraved with the VIUD logo and serial number and they're looking great!

 I also experimented with custom logo/text and it worked out very well but the price point to have it done is unfortunately large enough to make it only worthwhile for larger quantities (say 10 or more).

Custom Logo and Text Example

There's not much left to do! I can conformal coat all the USB boards and then find, design and setup an online store. Unfortunately, it looks as though I may be away all summer which will put another delay in the VIUD progress but it won't be long now!

Monday, March 14, 2016

Week(s) in Review: 14 March 2016

Its been a busy month for me in other projects, particularly with the release of the Thieves Guild DLC for Elder Scrolls Online

Besides a little bit of label preparation the only other news to note is that the anodized cases have arrived and they look great!


Titanium VIUD (Left) and 4 Anodized Aluminum Colors


Next steps are to polish the Titanium bases so I can have the VIUD logo and serial number Laser engraved. After that we are ready to start actually selling things!

Tuesday, February 16, 2016

Week(s) in Review...16 February 2016

Its been a very busy week or two for me with both VIUD and non-VIUD related projects....


Aluminum Anodizing

I'm happy to say that the 150 Aluminum VIUD's are finally off to anodizing! The polishing of the bodies went well with no unforeseen issues. The preparation of the plugs took a little longer than expected. Originally I was looking into buying or making a broaching set for squaring the rounded inside corners of the plug. However, I decided to simply file the corners by grinding a small square file to be the exact width of the hole and making a simple handle to hold the file.  Filing the Aluminum plugs took some time but was relatively easy and we'll see if the same holds for the Titanium plugs. I wasn't going to polish the plugs but the filing created a sharp edge which was good to get rounded with a quick buffing.

Next step was cleaning everything. The buffing process caked a considerable amount of debris in all the nooks and crannies of the parts so I soaked everything for a day in Mineral Spirits and then brushed/wiped each part and left it to dry. 

For this production run I'm doing four basic colors for the Aluminum VIUDs:
  • Black (already done)
  • Red
  • Blue
  • Green
There are a large number of potential colors I could use but there is a large minimum charge for the anodizing so we'll start with these four colors and expand in another production run if there is demand for any more.

A Little More Impact Testing....

I did another run of impact testing with a new set of USB circuit boards and a modified epoxy filling technique to ensure everything works as expected and there are no premature failures. Fortunately, the VIUDs fared better than my new stone target which broke clean in half while testing the Titanium VIUD at speeds above 200 km/hr.
Another Broken Stone Target
Fortunately I think I'm done with impact testing for now as I don't know what I can actually use for a stone target that won't break on me...perhaps a really thick custom made concrete pad with rebar reinforcement.

The Aluminum VIUD managed to survive up to impact speeds of 230 km/hr on the stone target which seems to be the typical failure point for the modified epoxy technique. The Titanium VIUD broke a new record by surviving impact speeds up to 250 km/hr on the stone target which is rather incredible when you think about it let alone experience the violent event itself.


Cap Magnets

I've always been trying to figure the best way to secure the magnets in the cap. Initially I tried superglue which works reasonably well but is a little messy and tends to fail at low to moderate impacts.

I then tried denting the metal around the magnet on the inside using metal point punch. This works pretty well in Aluminum but in the much harder Titanium it is very difficult to hit the punch hard enough to secure the magnet but not so hard as to crack or break the magnet. This method also tends to fail at moderate impacts.

On the last set of impact tests I tried another method: covering the magnet with a small amount of epoxy (the same stuff I use to fill the base). I didn't think this would work very well as you can only fit about 0.05" (1.3 mm) of epoxy above the magnet and still leave room for the USB connector. Fortunately I was completely wrong and the epoxy didn't start cracking until very high impacts, far surpassing the other two methods I tried.


Shipping Things

With the help of my lovely assistant I also figured out the details on how the VIUDs are going to be shipped. Originally I was planning on just using small bubble wrap bags from Canada Post but my wife found a better idea of small cardboard boxes which ended up being a little bit cheaper and looks/works better as well. 


Next Week(s)...

While I'm waiting for the Aluminum parts to be anodized I can start finishing the parts for the 100 Titanium VIUDs. I'm also working on getting the details sorted out for the Laser marking.

Saturday, January 30, 2016

Week in Review...30 January 2016

It has been a busy week or two in VIUD production, although I didn't get as much done as I wanted due to work that needed to get done on www.uesp.net.


More Impact Testing

About 100 more impact tests with the air cannon have been done to test a few different types and methods of epoxy fills in order to improve the VIUD's shock resistance (more on that in a future blog post...soon). I've managed to successfully test speeds over 300 km/h (200 miles/hour) with impact shocks nearing 5000 G which seem to be the limit of what can be accomplished with the current shock testing rig for a couple of reasons.

At lower speeds the air gun pressure was roughly linear with the output speed of the VIUD but exceeding 25 psi of pressure the output speed quickly flattens out (see the graph on the right). Since the theoretical terminal velocity of the VIUD is around 200 km/h (120 miles/hour) its going to be difficult to get it to go much faster than this. I may be able to get a little more speed out it by mounting the VIUD in a foam "bullet" to increase the firing efficiency but I don't know exactly how much that will get me.


At these high speeds the impact targets are also taking a good beating. The wood target is beat up pretty well but has survived 100 impacts and can probably take 100 more before needing to be replaced. The stone targets, however, have fared less well...


Stone Targets Destroyed by VIUD Impact Tests

Against the heavier and tougher Titanium VIUD at speeds above 200 km/h (120 miles/hour) a new stone target (left image above) broke after just 4 impact tests. I've since started using a thicker 2" Arkansas Limestone target which is a bit softer but seems to take the hits a bit better.

I also seem to have reached a measurement limit with the high-speed camera. The Casio Exilim EX-ZR200 was the cheapest camera I could find that could go up to 1000 fps. This is much faster than most cameras but this speed seems to limit the measured impact accelerations to under 5000 G. At this magnitude the actual impact occurs in well under one frame (<< 1 ms) so it is likely underestimating the actual impact force. I'd love to get a better camera that can do at least 10k fps or better but the ones I've looked at are quite pricey.


Aluminum Case Preparation

Before I can get the remainder of the Aluminum cases anodized there is a fair amount of preparation work needed. In truth, they could probably be anodized as they are and turn out OK but I'd prefer to take a little bit of time and make them better than just "OK".

First step was to make a simple jig that can hold the VIUD cap or base securely, quickly, and accurately in the lathe without damaging them. It was relatively straightforward to design and manufacture an Aluminum collet piece sized exactly to the outer diameter of the VIUD.


Simple Jig for Holding a VIUD Cap/Base in the Lathe

Using this jig I increased the size of the cosmetic chamfer on the ends of the cap and base from essentially 0.00" (it was barely what you could call a "broken" edge) to 0.01". While this seems like an insignificant modification it stops this edge from feeling sharp and will help the anodizing from chipping prematurely.

Next step is to polish all remaining Aluminum 150 caps and bases. The finished surface as they are is typical dull Aluminum. By polishing to a near mirror finish the resulting anodized surface will be much shinier and it also helps break any remaining sharp edges for a better feel as well as preventing the anodized surface from chipping.
Comparing Original (Left) and Polished (Right) Aluminum VIUD Bodies

Next Week...

I've just started polishing the bodies so that will be my first task next week followed by finishing the VIUD plugs and then cleaning everything. There are more impact tests I'd like to do as well if I have time. The next week will be very busy in UESP related work but stay tuned for more progress reports in a week or two!


Monday, January 11, 2016

The Start of Another Year

The start of another year and the end of another break in the VIUD's story. I wasn't intending on such a long break but there ended up being a lot of maintenance and work that needed doing on UESP.net. Now that I've finally caught up on that work I can begin to focus a bit more on the completing the VIUD.

I'm still basically where I was on the last blog post but the short list is essentially:

  • Complete detailing/finishing all the cases (in progress).
  • Order all the parts needed for assembly (mostly done).
  • Finalize research on the epoxy technique and premature USB failures (more on that in a future blog post).
  • Figure out a sales platform and all the subsequent details (prices, taxes, shipping).
So still an appreciable amount of work left to do but the end is definitely in sight.

Wednesday, June 3, 2015

Production Starts!

While I've been silent on the VIUD front for the past few months it has been mostly due to waiting for the first 300 VIUD cases (200 Aluminum, 100 Titanium) to finish production. They took a long time to get here but they finally arrived and are looking great!


What 300 VIUD Cases Look Like


Titanium VIUD
Anodized Black Aluminum VIUD

I'd love to say that I'll begin selling VIUDs in the near future but there are just a "few" tasks left before that can happen:

  • Polish and clean the 150 non-anodized Aluminum.
  • Anodize the 150 Aluminum sets 3 different colours.
  • Laser engrave everything with a logo and serial number.
  • Order all the various parts required for assembly.
  • Finish testing and finalizing the epoxy type and assembly procedure.
  • Create a few tools and jigs to help with assembly.
  • Install 600 magnets.
  • Create a VIUD shopping site. I'll probably use a service that offers pre-built stores but there is still a good amount of customization and setup to do.
  • Create a simple assembly and non-conformance tracking database.
  • Get shipping procedures and costs finalized.
  • Figure out a sales price for the VIUDs.
  • Start selling!
Sounds exhausting and while my summer is usually busier than average I hope to be able to finish everything in this list and start selling a few VIUDs this fall. Stay tuned!


Thursday, March 5, 2015

Evaluating New Case Manufacturers

In the last post I mentioned finding four new case manufacturers for the VIUD and having a few samples made from each one. To choose one manufacturer for a larger case order we'll have to evaluate/test the samples and pick one that has the best combination of quality and price.


Machining Quality

The easiest test we can do for the case samples is to simply make sure we received what we asked for. We'll measure all the dimensions from the three case pieces (base, cap, and plug) and compare that with the drawing specification for all four manufacturers:


ItemManufacturer AManufacturer BManufacturer CManufacturer D
Dimensions OK
16 / 32
30 / 32
31 / 32
31 / 32
Dimensions Not OK
8
2
1
1
Dimensions Way Off!
8
0
0
0
Finish
Al - Poor Clear Anodized
Ti - Black?
Al - Natural
Ti - Natural
Al - Clear Anodized
Ti - Natural
Al - Anodized Black
Ti - Natural
Assembly
Threads Don't Fit
OK
OK
OK
Cap chamfer for o-ring too small

Manufacturers B, C, and D all fair well with only a couple minor deviations outside of the expected dimension tolerances (mainly a couple chamfers that were a bit smaller than desired). Manufacturer A, on the other hand, was so bad I had to create a special category just for it. Half of the dimensions were outside of tolerances and some features were outright missing. The threads, or I should say the attempt of threads, were a wonder to behold. All the inside threads were double-started, the screw angles of the exterior threads were wrong and skewed to one side and at least one thread was not square to the body by more than 5°
. Even a considerable attempt to restore the threads with a tap and file failed to get them working fully. It is fair to say that Manufacturer A won't be further considered even though they did ship first and didn't charge me anything (I wonder why).


Appearance

The quantitative dimension comparison showed Manufacturers B, C, and D to be very close with each other but how about a more qualitative "appearance" test? Although accurate dimensions are important the case has to look good as well. We can rate a few different appearance factors for each manufacturer:


ItemManufacturer AManufacturer BManufacturer CManufacturer D
Surface Finish
Very Poor
Very Good
Excellent
Very Good
Knurl Quality
Very Poor
Good
Very Good
Very Good
Assembly Fit
Doesn't Assemble!
Very Good
Good
Acceptable
Overall Appearance
Very Poor
Good
Excellent
Very Good

Ignoring the terrible performance from Manufacturer A, the other three look equally well with C and D slightly leading the pack.


Stress Testing

The final test will be a destructive stress test to failure. The purpose of this test is to determine the type and quality of material used. While I specified very specific alloys (Al 7075-T6 and Ti Grade 5) it is difficult to tell the exact alloy used. It is possible they used a much cheaper alloy (like Al 6061 or Ti Grade 2) or mistakenly used an untempered Aluminum alloy like 7075 instead of 7075-T6. The only way I know to test the alloy, other than a spectrograph, is a stress test to see at what load the item fails.

This will be the first destructive stress test in a long while...the last one was actually the first brass prototype almost two years ago. I've been meaning to destructively test a few from the prototype #5 pre-production test but I have too many non-destructive tests still to do. These tests will validate, or not, the theoretical stress modelling I've done in Autodesk Inventor.


The stress tests will use an assembled unit without any epoxy or USB board. We'll start with the end-to-end stress test in my hydraulic shop press and finish with a side stress test if the unit survives. Note that a value of "> 9 tons" in the following table indicates it didn't fail in the test.


Stress TestExpected FailureManufacturer AManufacturer BManufacturer CManufacturer D
Al : End-To-End
6.5 tons
6.5 tons
6 tons
> 9 tons
> 9 tons
Ti : End-To-End
9 tons
> 9 tons
> 9 tons
> 9 tons
> 9 tons
Al : Side
4 tons
4 tons
4.5 tons
6.5 tons
7 tons
Ti : Side
6 tons
> 9 tons
8 tons
> 9 tons
> 9 tons

The complete video of the stress testing is also available:


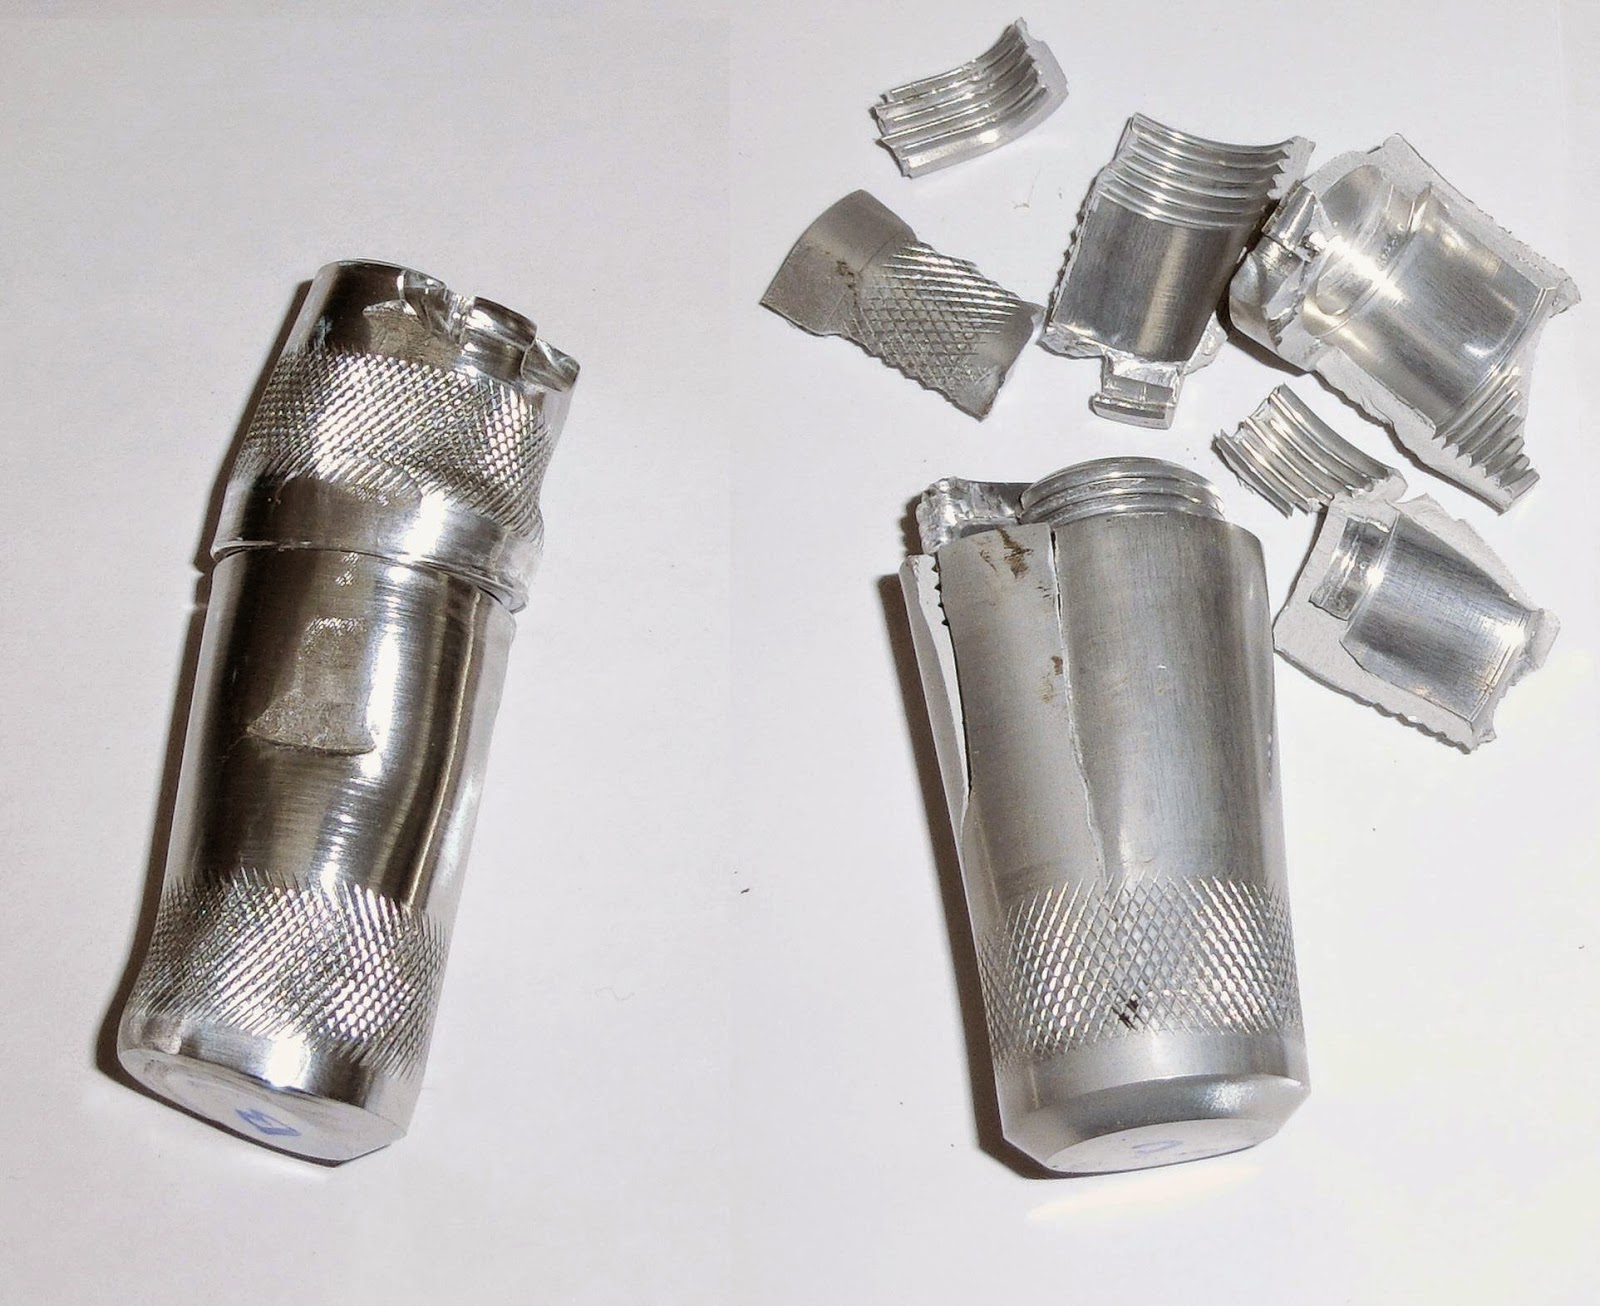
From the stress failure loads and the way the case failed I would say that Manufacturers A and B used a lower strength Aluminum alloy like untempered 7075 or 6061 while Manufacturers C and D used the 7075-T6 alloy as specified. Both A and B failed in a ductile manner (the case deformed slowly and remained in one piece) while both C and D cracked suddenly (see image below). This sudden cracking is typical of a stronger alloy like 7075-T6 or 7068 which are more brittle than other Aluminum alloys. 


Comparison of Failures in Lower Strength Aluminum Alloy (Left) and Higher Strength (Right)

Another interesting thing to note is that the cases C and D outperformed the theoretical failure loads by a good margin, at least 50%. The cases failed pretty much where they were expected to fail (cap threads for the end-to-end test) and there were no big surprises. The hole for the lanyard mount did fail in the end-to-end stress test on two cases at high loads but this was expected to happen at some point and the failures were not premature.


Which One?

Considering all case evaluations and tests Manufacturers C and D come out notably ahead of the other two. Manufacturer C has a low lead time but higher price while Manufacturer D has a very long lead time but the cheapest price by a considerable margin. My choice for the first large order will be Manufacturer D, mostly due to the price, but I'll keep C in mind as a backup.