Thursday, August 29, 2013

The Toughest USB Drive in the World

I was thinking last night while I was trying to fall asleep about the following question:

What do I need to do to honestly be able to call the VIUD the world's toughest USB drive?

While I think we're already pretty close to this point we'll look at a few areas that a USB drive needs to excel at to be called "tough":

  1. Pressure
  2. Temperature
  3. Acceleration / Shock
  4. Force / Load

The pressure rating is an immediate win for our VIUD: currently rated at 3000 psi it is at least ten times higher than any other USB drive out there except for the old Tyukalov which was rated at 2000 psi.

So far we haven't done any temperature tests except the failed 2 minutes at 1100 °C propane torch test on prototype #1. Most USB drives don't have explicit temperature ratings or they are simply set incredibly low but the LaCie Xtremkey is rated for 3 minutes at 200 °C and 30 seconds fire exposure. I hope I can beat both these ratings despite using essentially off-the-shelf USB drives since the failure mechanism is the plastic in the USB connector melting.

Most drives are also not rated for shock/acceleration with the Xtremkey again topping the chart with a rating of 50G. I haven't done any shock testing yet although the high-speed camera has been ordered and some basic calculations seem to indicate that a 50G rating should be easily beaten.

The force/load tests are really the most important ones for a "tough" USB drive and there are actually no drives out there with explicit force or load ratings. There are a few with unofficial "car/SUV drive over rating" but this is actually a relatively low bar to pass. Even a large moving truck driving over a USB only exerts around 2 tons of force which even our low strength brass prototype could withstand. Stress modelling of our Aluminum and Titanium VIUD design shows a worst case failure in end-to-end stress to be in the area of 8-10 tons. This would seem to point towards a win this category although actual destructive stress testing of competing drives will have to be done to be sure.

So while the prospecst look very good that we will be able to call our VIUD the "world's toughest USB drive" we have a bunch of testing to do first.


Monday, August 26, 2013

Prototype #2

VIUD Prototype #2
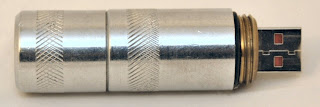
I learned a lot from making, and subsequently destroying, our first VIUD prototype and we'll quickly jump to making a second one. This prototype will essentially be the same design as the first one but be made of 6063 Aluminum instead of Brass. In this case I choose a cheaper Aluminum merely for convenience but we will likely not want to use 6063 in the end as it is one of the weaker alloys.

Machining will again be done by myself with a few tricks learned from the first prototype. The process went well although I did have issues with the cap not lining up perfectly with the body when closed despite trying to be very careful when tapping the threads. I believe the issue here is merely due to the inherent inaccuracies of manual tapping. 

Despite a slightly crooked cap pressure testing at 3000 psi for 1 hour passed the first time without any leakage. There is little point in destructive stress testing this prototype as we won't be using the same type of Aluminum in the final design, and it should be same strength as the Brass prototype anyways.

One notable observation is that this prototype is significantly lighter than the first one weighing in at only 60 g despite using a Brass thread plug. This is much nicer than the 150 g of the Brass prototype and while it is heavier than most consumer level USB drives you see it is light enough to not really notice it in your pocket, at least no where near enough to be annoying.

Prototype #2 With the Cap Off

I should note that while I am writing this blog entry in the summer of 2013 I actually made this prototype nearly a year ago in the fall of 2012. Since then this prototype has been in my pocket or backpack almost everywhere I go. After using it some hundreds of times I can't really find any fault in the design other than it not fitting some closely spaced USB connections with other things plugged into them. Its convenient, works well, nothing has broken or worn noticeably, it is relatively pretty despite my limited machining skills, and it has turned a few heads from co-workers and friends (always a good sign)!

Thursday, August 22, 2013

The First Prototype

Now that we've done our basic design and research for our rugged USB drive it's time to start making something! I'm a very amateur machinist and the basic design for the drive case is simple enough for me to attempt to make, at least for the testing prototypes. 

I choose Brass for the first prototype's material for a number of reasons: 


Brass Pros
  • Easy to machine
  • Cheap
  • Shiny!
Brass Cons
  • Mechanically Weak
  • Heavy


This is fine for a simple prototype but the Brass cons are more than enough to consider other materials for the final product (materials are to be discussed in a future blog entry).

The design of the VIUD case is relatively simple and is composed of three parts:

  1. Cap - Removable part that covers the USB connector and attached with thread.
  2. Base - Main body of the USB 
  3. Plug - Threaded plug which the USB fits into and is permanently mounted into the base.
Basic Components of our VIUD Design

Machining these parts is relatively simple, even for an amateur, although there are a few "gotchas" to note:
  • Using a tap to manually create the threads is difficult at best. You have to tap before machining the case OD or else the body walls buckle outwards. 
  • It is difficult/impossible to create a perfectly straight thread with manually tapping (even with a jig) which causes the cap to not sit perfectly on the body. This can be corrected by filing the edge of the cap but is tedious. 
  • The hole in the plug for the USB connector is machined with round corners and needs to be filed out square.
  • The groove in the plug for the main o-ring seal was done after assembly and the epoxy had hardened to ensure a perfect fit.
  • The mount for the cap at the end of the base was added afterwards by press fitting an additional piece into the base.
For the USB flash drive itself I merely purchased a cheap 2GB consumer level drive and removed the plastic case. Assembly merely required to insert the USB into the rear side of the plug, fill the base with epoxy (enough to squeeze out when assembled) and screw the plug into the base. After letting the epoxy dry and machining a groove for the o-ring seal in the plug the first prototype VIUD is finished! Unfortunately I don't have any pictures of the prototype before its destruction in stress testing.

Testing

End-to-End Stress Modelling
Our first VIUD prototype may not look too pretty but it is fine for basic testing of our design. First is a simple handling test: How does the drive feel in terms of weight and size. The size feels fine although it is significantly larger than most USB flash drives these days. It is a little on the heavy side, however, at around 150 g. Not terrible but a little too noticeable when held in your pocket. The overall physical operation of the drive is also fine and doesn't reveal any unforeseen difficulties.

Next, with our simple and cheap pressure testing rig we can easily see what pressure our prototype can handle. Fortunately, even with a slightly crooked cap it successfully passed a 1 hour test at 3000 psi with no leaks! 

Temperature testing was next and I was evidently a little too eager at this stage by using a propane blow torch. Even with just a 2 minute external exposure of 1100 °C the plastic in the USB connector melted completely and a quick repair attempt failed to get the USB drive to respond when plugged in to a computer.

Since the drive was already toast the next and final test was the destructive stress test. I purchased a basic 10 ton hydraulic press from my favourite store Princess Auto. I had done some basic stress modelling using Solidworks and Autocad Inventor which showed the failure of the Brass prototype should occur at around 4000-5000 lbs on the threads of the cap with a vertical load. The modelling proved very accurate as that is exactly when and where the prototype failed! We usually assume modelling is reasonably accurate but it is always nice to see it verified once and a while.

Brass VIUD Prototype #1 -- After Destructive Testing

Lessons Learned

Despite the first prototype being destroyed during testing it yielded a number of important insights:
  • Validated the overall design.
  • Handling pressures up to 3000 psi should be no issue.
  • Brass is too heavy and too soft a material for a true VIUD.
  • Manually trying to tap the threads myself doesn't work very well.
  • The mechanical stress modelling agrees very well with the actual stress testing.
  • Temperature testing will have to be done a little more carefully (no propane torch)!
More prototypes, testing and research await for us on our quest for the ultimate VIUD....


Monday, August 19, 2013

High Pressure Testing on the Cheap

One the primary design requirements for the rugged USB drive is a high pressure rating: at least 1000 psi if not considerably higher. In order to test our design to see if it actually works we'll need a pressure testing rig. Creating a completely custom pressure testing rig is not necessarily difficult but even a small one would end up being $1000s in design and manufacturing costs. It would be nice to be able to create a very simple rig consisting of cheaper off-the-shelf components.

Looking at industrial product sites like McMaster or Acklands-Grainger we find that the highest pressure rating easily obtainable are 3000 psi which should be more than sufficient for our purposes and are relatively cheap. For now the desired volume of the rig can be kept low: just enough for 1 or 2 USB cases at a time.

For pressurization of the vessel normally some sort of pump would be used but in order to keep the design simple and costs as low as possible we'll just use a piston which can be pushed into the vessel. Since the vessel volume is small we can use a rod with a small cross-section (0.5in diameter) and thus keep the force required to push it in low (< 100 kgs) as well as the distance it needs to be pushed in (about 2in for 3000psi for this vessel).
The overall design of the pressure vessel can be seen below using off-the-shelf 2in NPT iron pipe fittings rated at 3000 psi. Its overall height is just under 1 ft and its total weight is around 35 lbs due to the heavy duty iron fittings. We some effort we could probably fit 4-6 USB cases inside it at a time.
Overall Pressure Vessel Design
The details for the pressurization lid and rod can be seen below. We use two hydraulic o-ring lip seals which are rated to 3000 psi each and result in no leakage when the rod is pushed in or out.  
Detail of the Pressurization Rod
The final material cost for this pressure testing rig ended up being less than $100 which is surprisingly low. The assembly of the rig was very simple and other than screwing together the pipe fittings it only required a simple machining of the end cap for the lip seals. Use of the rig is relatively straightforward:

  1. Remove cap.
  2. Add object to be tested.
  3. Fill vessel with water.
  4. Replace cap ensuring pressurization rod is extended.
  5. Push the pressurization rod into the vessel to achieve the desired pressure. I created a simple clamp using two threaded rods and some Aluminum plates which cannot slip off the rod.
  6. Wait for a set period of time, typically one hour.
  7. De-pressurize vessel, remove object and check for failures.


More features could be easily added to this design depending on the budget and desired requirements. A few things I can think of being needed in the near future for our purposes:
  • Ball or gate valve to more easily put objects inside the vessel (costly for a 3000 psi version).
  • Larger volume for testing more USB drives at once. This may also require the diameter of the pressurization rod to be increased.
  • Change to a hand pump for pressurization. This would be required if the vessel volume is considerably increased.

Now that we've got a pressure test rig we can get on to creating and testing some VIUD prototypes!